
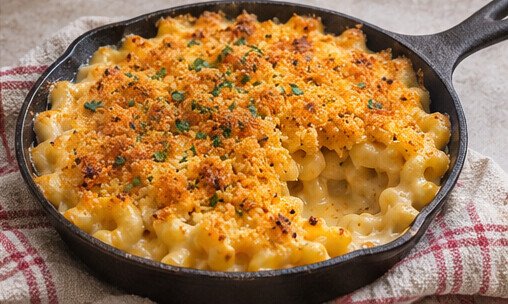
Skillet mac and cheese combines tender pasta, a creamy cheese sauce and a crisp golden topping. This version starts with a simple butter-flour roux, adds milk gradually, then melts in cheddar off the heat so the sauce stays smooth. A short oven finish toasts the breadcrumbs without drying the pasta. It works as a comforting main with salad or as a side for a larger meal.
Why This Method Works
A smooth cheese sauce depends on gentle heat and gradual mixing. The roux thickens the milk, while freshly grated cheese melts more evenly than pre-shredded cheese coated with anti-caking starches. Slightly undercooking the pasta leaves room for the oven finish. Breadcrumbs are toasted with butter first, so they turn golden quickly without requiring a long bake.
This recipe is written for a standard home kitchen, with visual and texture cues alongside the timing. Pan size, ingredient temperature and stove strength all affect how quickly food cooks, so use the stated minutes as a guide rather than a substitute for checking the dish. Prep the ingredients before cooking and make small adjustments at the end; that approach is more reliable than trying to correct a sauce or texture after it has gone too far.
Ingredients
Makes: 6 servings | Active prep: 20 minutes | Cooking: 30 minutes. Gather and measure everything before you begin.
- 350 g elbow macaroni or short pasta
- 3 tbsp butter, divided
- 2 tbsp all-purpose flour
- 600 ml whole milk, warmed
- 250 g sharp cheddar, freshly grated
- 100 g Monterey Jack or mozzarella, grated
- ½ tsp mustard powder or 1 tsp Dijon mustard
- ½ tsp fine salt, plus more for pasta water
- Black pepper and a pinch of paprika
- 60 g panko breadcrumbs
- 1 tbsp chopped parsley, optional
Ingredient notes
- Sharp cheddar gives a pronounced cheese flavor. Pair it with a good melting cheese such as Monterey Jack for a creamy texture.
- Grate cheese from a block just before cooking. Pre-shredded cheese can still be used, but the sauce may be slightly less silky.
- Salt pasta water generously, but remember the cheese is salty too. Taste the sauce before adding extra salt.
- Panko creates a light, crunchy topping. Regular breadcrumbs work; toast them a little less because they brown more quickly.
Equipment and Prep
Use a large oven-safe skillet or prepare a baking dish for the final bake. A whisk helps prevent lumps in the roux, while a wooden spoon is useful for folding pasta into the sauce. Have cheese grated before heating the milk, because the sauce comes together quickly. A thermometer is optional; keep the sauce below a simmer once cheese is added.
Before cooking, read through the method once and organize ingredients in the order you will use them. Keep raw meat and seafood separate from ready-to-eat toppings, and wash hands, boards and utensils after they touch raw ingredients. A thermometer is useful for checking poultry; remove it from the heat when the thickest piece reaches a safe temperature. For stovetop recipes, medium heat is a starting point, not a fixed setting: lower it if food darkens before it softens, and raise it only when the pan is dry and ready to sear.
Step-by-Step Method
1. Boil pasta until firm
Heat the oven to 220°C/425°F. Bring a large pot of salted water to a boil and cook pasta for 1–2 minutes less than the package suggests. It should be firm in the center. Drain, reserving a cup of pasta water.
2. Toast the breadcrumbs
Melt one tablespoon of butter in an oven-safe skillet. Add panko and stir over medium heat until golden and crisp, about 3–4 minutes. Transfer to a bowl so it does not continue browning in the hot pan.
3. Cook a smooth roux
Melt the remaining butter in the skillet over medium heat. Whisk in flour and cook for 1 minute, stirring constantly, until the mixture smells lightly nutty but does not brown. A smooth roux is the base that thickens the sauce.
4. Whisk in milk
Pour in warm milk gradually, whisking after each addition. Continue until smooth, then simmer gently for 4–6 minutes until it lightly coats the back of a spoon. Add mustard, salt, pepper and paprika. Lower the heat before adding cheese.
5. Melt in the cheese
Add grated cheddar and the second cheese in handfuls, stirring until each addition melts. If the sauce becomes too thick, loosen it with reserved pasta water or warm milk. Avoid boiling after cheese is added.
6. Fold in pasta and top
Fold drained pasta into the sauce until coated. Taste and adjust seasoning. Scatter toasted breadcrumbs evenly over the top. If your skillet is not oven-safe, transfer the mixture to a baking dish first.
7. Bake and rest
Bake for 6–8 minutes until bubbling at the edges and the topping is golden. Rest for 5 minutes before serving; the sauce thickens slightly and the skillet remains very hot.
Texture and Troubleshooting
Use these adjustments to diagnose the most common changes that can happen in a home kitchen. First identify whether the issue is moisture, heat or seasoning. Changing one factor at a time makes it easier to recover the dish and learn what to do next time.
- A grainy sauce usually comes from high heat or cheese added to boiling liquid. Turn the heat low and add cheese gradually.
- If the sauce is too thick, stir in reserved pasta water a tablespoon at a time. Pasta continues absorbing liquid as it rests.
- A watery sauce may need a few more minutes of gentle thickening before the cheese goes in. Do not try to fix it by adding more cheese immediately.
- If breadcrumbs darken too fast, cover loosely with foil or shorten the oven time; they were already toasted in the skillet.
Easy Variations
The basic method is flexible, but substitutions can change cooking time and moisture. Keep the core balance of salty, bright, rich and fresh flavors in mind. Add watery vegetables early enough for excess liquid to evaporate, and add delicate herbs or dairy near the end.
- Stir in steamed broccoli, peas or roasted cauliflower before adding breadcrumbs for a vegetable-forward version.
- Add cooked bacon or roasted mushrooms for a heartier skillet, making sure any extra ingredients are not wet.
- Use smoked paprika or a little hot sauce for a more savory finish; add gradually so the cheddar remains the main flavor.
Serving, Storage and Reheating
Serve mac and cheese hot from the skillet with a crisp green salad, roasted vegetables or steamed greens. It also works as a side for grilled chicken or barbecue. Refrigerate leftovers in a covered container for up to 3 days. Reheat gently in a covered pan or microwave with a splash of milk; stir once. The breadcrumb topping softens as it sits, so add a few fresh toasted crumbs if you want crunch again.
For food safety, refrigerate perishable leftovers within two hours, using shallow containers so they cool quickly. Reheat only the portion you plan to eat and bring it until steaming hot throughout. If the dish contains meat, use a food thermometer where practical rather than relying on color alone. These simple steps help preserve texture while keeping make-ahead meals easy to manage.
Recipe at a glance
Yield: 6 servings. Prep: 20 minutes. Cook: 30 minutes. Total time: 50 minutes. Start by preparing and measuring the ingredients, follow the cooking order above, then taste and finish with the suggested toppings just before serving.
Frequently Asked Questions
Can I make mac and cheese ahead?
Prepare the sauce and pasta, combine them, then refrigerate before adding the breadcrumb topping. Add a splash of milk and bake until bubbling; keep an eye on the edges so the pasta does not dry out.
Why use freshly grated cheese?
Block cheese melts more smoothly because it is not coated with anti-caking agents. If using pre-shredded cheese, keep the heat low and stir patiently.
Can I freeze skillet mac and cheese?
It can be frozen, but the sauce may separate slightly after thawing. Cool portions, freeze airtight and reheat slowly with milk while stirring.
Which pasta shape works best?
Elbows are classic, but shells, cavatappi or other short shapes hold sauce well. Choose pasta with ridges or curves for more cheese in each bite.
This American recipe is designed as a practical home-cooking guide. Adjust salt and heat to your ingredients and preferences, and use the texture cues in the method for the best result.